
Suitable for all ages This Christmas has me longing for simple pleasures. I'm not sure if it has anything to do with the crazy state of our world or the fact we're reading "The Little House on the Prairie" series for school, but I have caught myself referencing pioneer life on a daily basis since August. The immense pleasure gained from the simpler things in life has triggered something inside of me. Yes, this is a post about DIY ornaments! But it is also so much more to me right now. It's a call to be more intentional with our time together, more intentional with how we celebrate the holidays, and less of what doesn't matter. This year my goal is to revive the old ways! The old-fashioned traditions hold a special place in my heart. Stringing popcorn garland, decorating a gingerbread house from scratch and singing carols are all on my list! And on the top of my list are these easy to make salt dough ornaments. The children love when we work together to make something beautiful, not to mention this is a gift the kids can make and everyone will love to receive. Another positive to this recipe is you most likely have all the ingredients already in your cupboards. These humble ingredients, (salt, flour and water) come together to make a versatile dough. I will show you how to make easy homestead ornaments or dressy keepsake ornaments like a "Baby's first Christmas!"  Salt Dough RecipeIngredients: 1 cup flour 1/2 cup salt Approximately 1cup water Mix flour and salt together and gradually add water until you reach dough consistency that is not sticky. Remove from bowl and knead on a floured surface to reach a smooth dough. Roll dough into a 1/4 inch thickness. Use cookie cutters or for a keepsake ornament, use a glass in a size larger than the child's hand. Get creative with the cookie cutters. Here we used a snowflake cutter and painted it to look like a poinsettia. 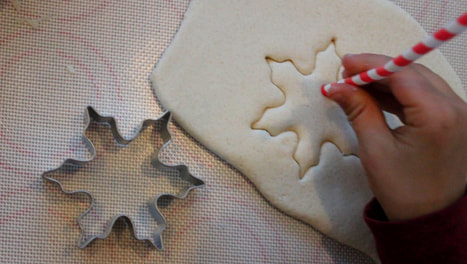 Use a straw to make a small hole for the string. If you're making a keepsake, now you will push the child's hand firmly into the circle using even pressure. If things don't go as planned, most toddlers and babies like to close their fists right as you try to put their hand into the dough, it is simple to mash it up and re-roll the dough and try again! Tip: Add interesting texture to your ornaments by pressing flowers, leaves, evergreens, or pinecones into the dough with medium pressure. To bake, place the ornaments on a piece of parchment paper on a tray. Set the oven to the lowest setting. I used the convection setting at 190F. This took approximately 4 hours, flipping them at the halfway point. Check the oven after two hours and every hour thereafter to prevent them from burning. Once they are hard, remove from the oven and let cool completely.  To paint the keepsake ornament: I like to use spray paint to dress these ornaments up. They have many metallic spray paints that give a dressy finish to the handprint. These were sprayed with silver spray paint and left to dry. I used a permanent marker to finish off this batch. Hindsight, I would have used a paint marker and dressed up the font but hey, it was 2013 then and I was impatient. 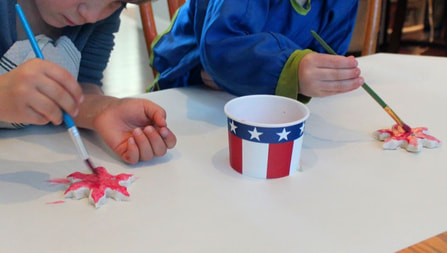 To paint homestead ornaments: We have used a variety of acrylic paints, the kind you can grab for 97 cents at your local craft store. These poinsettia ornaments were painted with metallic acrylic paint and regular, although I really like the sheen the metallic version gave. The yellow centers were added with a paint marker. I dress the kids in stained clothes and let them have at it, since these paints will not wash out. Don't forget to cover the table too. There are so many types of acrylic paints that would look great such as the glitter and chalk paints. Once the paint dries, hang with a string! Personalize each one and use it as a gift tag. 
0 Comments
Your comment will be posted after it is approved.
Leave a Reply. |

AuthorFrancesca, wife and mother of three, eagerly shares day-to-day life on her ten acre farm in northern Colorado. Categories
All
Archives
March 2023
|


 RSS Feed

|
Copyright © 2022 3 Seeds Farm
Site powered by Canopy Creative Marketing |
|